8. 打印进程地址转换过程
8.1. 实验目的
深入理解操作系统的段、页式内存管理,深入理解段表、页表、逻辑地址、线性地址、物理地址等概念;
实践段、页式内存管理的地址映射过程;
编程打印特定进程地址转换过程。
8.2. 实验内容
本次实验的基本内容是:
本实验在地址映射与共享实验的基础上,需要增加实现一个系统调用,使得你可以观察两个通过共享内存( shmget , shmat )通信的进程的内存共享情况。
例如,你可以实现以下系统调用:
int debug_paging(pid_t pid, void *address, const char *logPath);
当 address 为 NULL 的时候,该系统调用将会打印 pid 进程所有正在使用的页目录项和页表项。否则只输出 address 对应的页地址转换过程。当 logPath 为 NULL 打印输出为标准输出,否则为 logPath 对应的文本文件。
例如,对于以下测试程序:
/* test.c */
#define   __LIBRARY__
#include <stdio.h>
#include <stdlib.h>
#include <sys/types.h>
#include <unistd.h>

_syscall3(int, debug_paging, pid_t, pid, void *, address, const char *, logPath);

int i = 0x12345678;

int main(void)
{
    printf("The logical/virtual address of i is 0x%08x\n", &i);
    fflush(stdout);
    debug_paging(getpid(), &i, NULL);
    debug_paging(getpid(), NULL, "/usr/var/paging.log");
    return 0;
}
输出可以为:

图1. Demo
又比如,对于地址映射与共享实验,我们可以在 producer.c 调用 p = shmat(shmid) 后使用:
debug_paging(getpid(), p, "/usr/var/paging.log");
debug_paging(getpid(), NULL, "/usr/var/paging.log");
并在 consumer.c 调用 p = shmat(shmid) 后使用:
debug_paging(getpid(), NULL, "/usr/var/paging.log");
来观察和验证共享内存页的情况,输出可以为:

图2. Demo
可以看到,两个进程共享的内存页是 0xFA9000 。
8.3. 实验报告
完成实验后,在实验报告中回答如下问题:
页表中正在使用的页表项是连续的吗?这体现了分页的什么优点?
你觉的分段是必要的吗?现在的
Linux (x86-64)是怎么处理分段的?
8.3.1. 评分标准
输出能够反映内存共享情况,80%
实验报告,20%
8.4. 实验提示
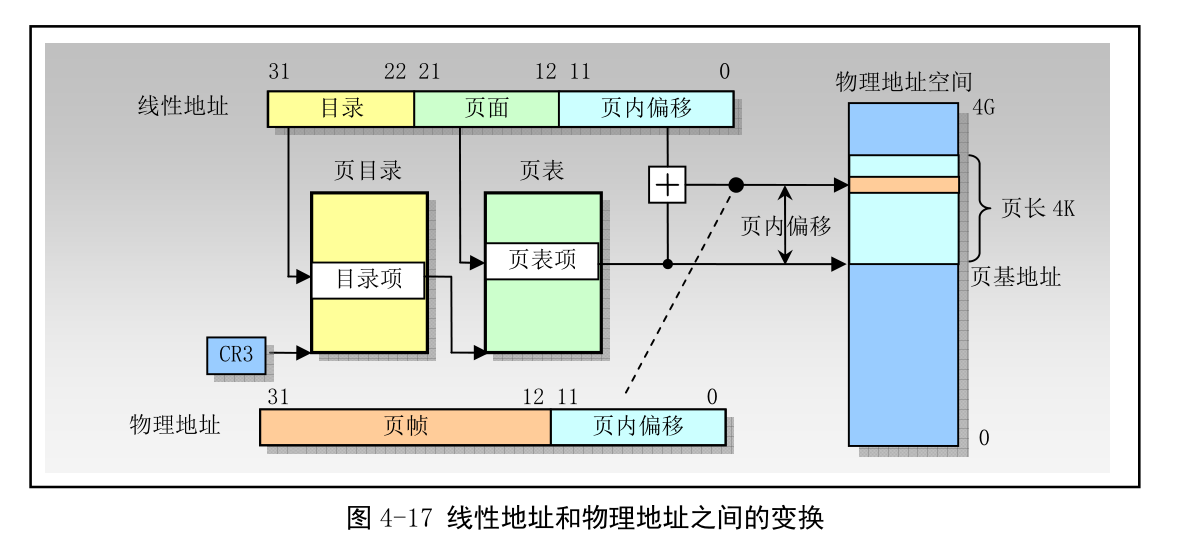
《注释》中的 4.3 和 4.4 节描述了 8086 下的分段和分页机制,第 13 章讲解了 Linux 0.11 下的内存管理(分段和分页管理)和分配机制,值得参考。
例如页转换和地址分配:

为了更方便的向文件或者终端格式化输出,你可以在 /kernel/printk.c 中实现一个 fprintk :
static char logbuf[1024];
int fprintk(int fd, const char *fmt, ...)
{
    va_list args;
    int count;
    struct file * file;
    struct m_inode * inode;

    va_start(args, fmt);
    count=vsprintf(logbuf, fmt, args);
    va_end(args);

    if (fd < 3)
    {
        __asm__("push %%fs\n\t"
            "push %%ds\n\t"
            "pop %%fs\n\t"
            "pushl %0\n\t"
            "pushl $logbuf\n\t"
            "pushl %1\n\t"
            "call sys_write\n\t"
            "addl $8,%%esp\n\t"
            "popl %0\n\t"
            "pop %%fs"
            ::"r" (count),"r" (fd):"ax","cx","dx");
    }
    else
    {
        if (!(file=current->filp[fd]))
            return 0;
        inode=file->f_inode;

        __asm__("push %%fs\n\t"
            "push %%ds\n\t"
            "pop %%fs\n\t"
            "pushl %0\n\t"
            "pushl $logbuf\n\t"
            "pushl %1\n\t"
            "pushl %2\n\t"
            "call file_write\n\t"
            "addl $12,%%esp\n\t"
            "popl %0\n\t"
            "pop %%fs"
            ::"r" (count),"r" (file),"r" (inode):"ax","cx","dx");
    }
    return count;
}
此外,别忘了在 /include/linux/kernel.h 中添加声明:
int fprintk(int fd, const char *fmt, ...);
由于我们是在内核中对页表进行输出处理,所以使用 系统调用 的时候别忘了加上 sys ,例如 sys_open 和 sys_close 。
最后,无论你是在 /kernel/ 还是 /mm/ 添加了系统调用的实现文件,记得修改对应的 Makefile 文件。